
Account Managed Changes by Your Team on B2B Autoship Orders
Wholesale accounts often ask you to make changes for them: add a product, push an order back a week, ship to a different dock, pause for the holidays. You can do all of this from the Scheduled Order in Autoship. Changes you make here also show in the buyer's portal.
To open a Scheduled Order: Shopify admin → Apps → Autoship Cloud → Scheduled Orders, then click the order.
This article covers:
- what you can and can't set on a single Scheduled Order
- changing products, frequency and dates, payment, shipping and the custom name
- pausing, rescheduling, processing early, skipping, cancelling and reactivating
What you can and can't set on one Scheduled Order
In B2B, what makes an account different lives on the company or location, not on one Scheduled Order. That way every Scheduled Order for a location matches what you agreed with that account, and a change you make for the account reaches all of its Scheduled Orders.
|
Field
|
On a single B2B Scheduled Order
|
|
Products and quantities
|
✅ Editable
|
|
Next occurrence date
|
✅ Editable
|
|
Status (Active / Paused)
|
✅ Editable
|
|
Shipping address and rate
|
✅ Editable
|
|
Custom name and notes
|
✅ Editable
|
|
Frequency and discount
|
Choose from the options that apply to the location
|
|
Payment method
Payment terms
|
Choose from the methods saved for that buyer and location. Terms come from the company location in Shopify - Shown, not editable on the scheduled order.
|
|
Item price
|
Comes from the location's catalog. Not editable here.
|
This is different from Autoship for consumer subscriptions, where you can set any value on an individual Scheduled Order.
To give one account something different, you can make the following changes and the next renewal will be automatically updated.
- A different frequency or discount: set options for the company or location.
- A different price: change the catalog assigned to the location in Shopify.
- Different payment terms: change the terms on the company location in Shopify.
Change products and quantities
- Open the Products step.
- To add an item, use Search and add products… (type at least 2 characters).
- To change a quantity, use the arrows next to the quantity or type a new number.
- To remove an item, click the trash icon on its row.
- Click Save.
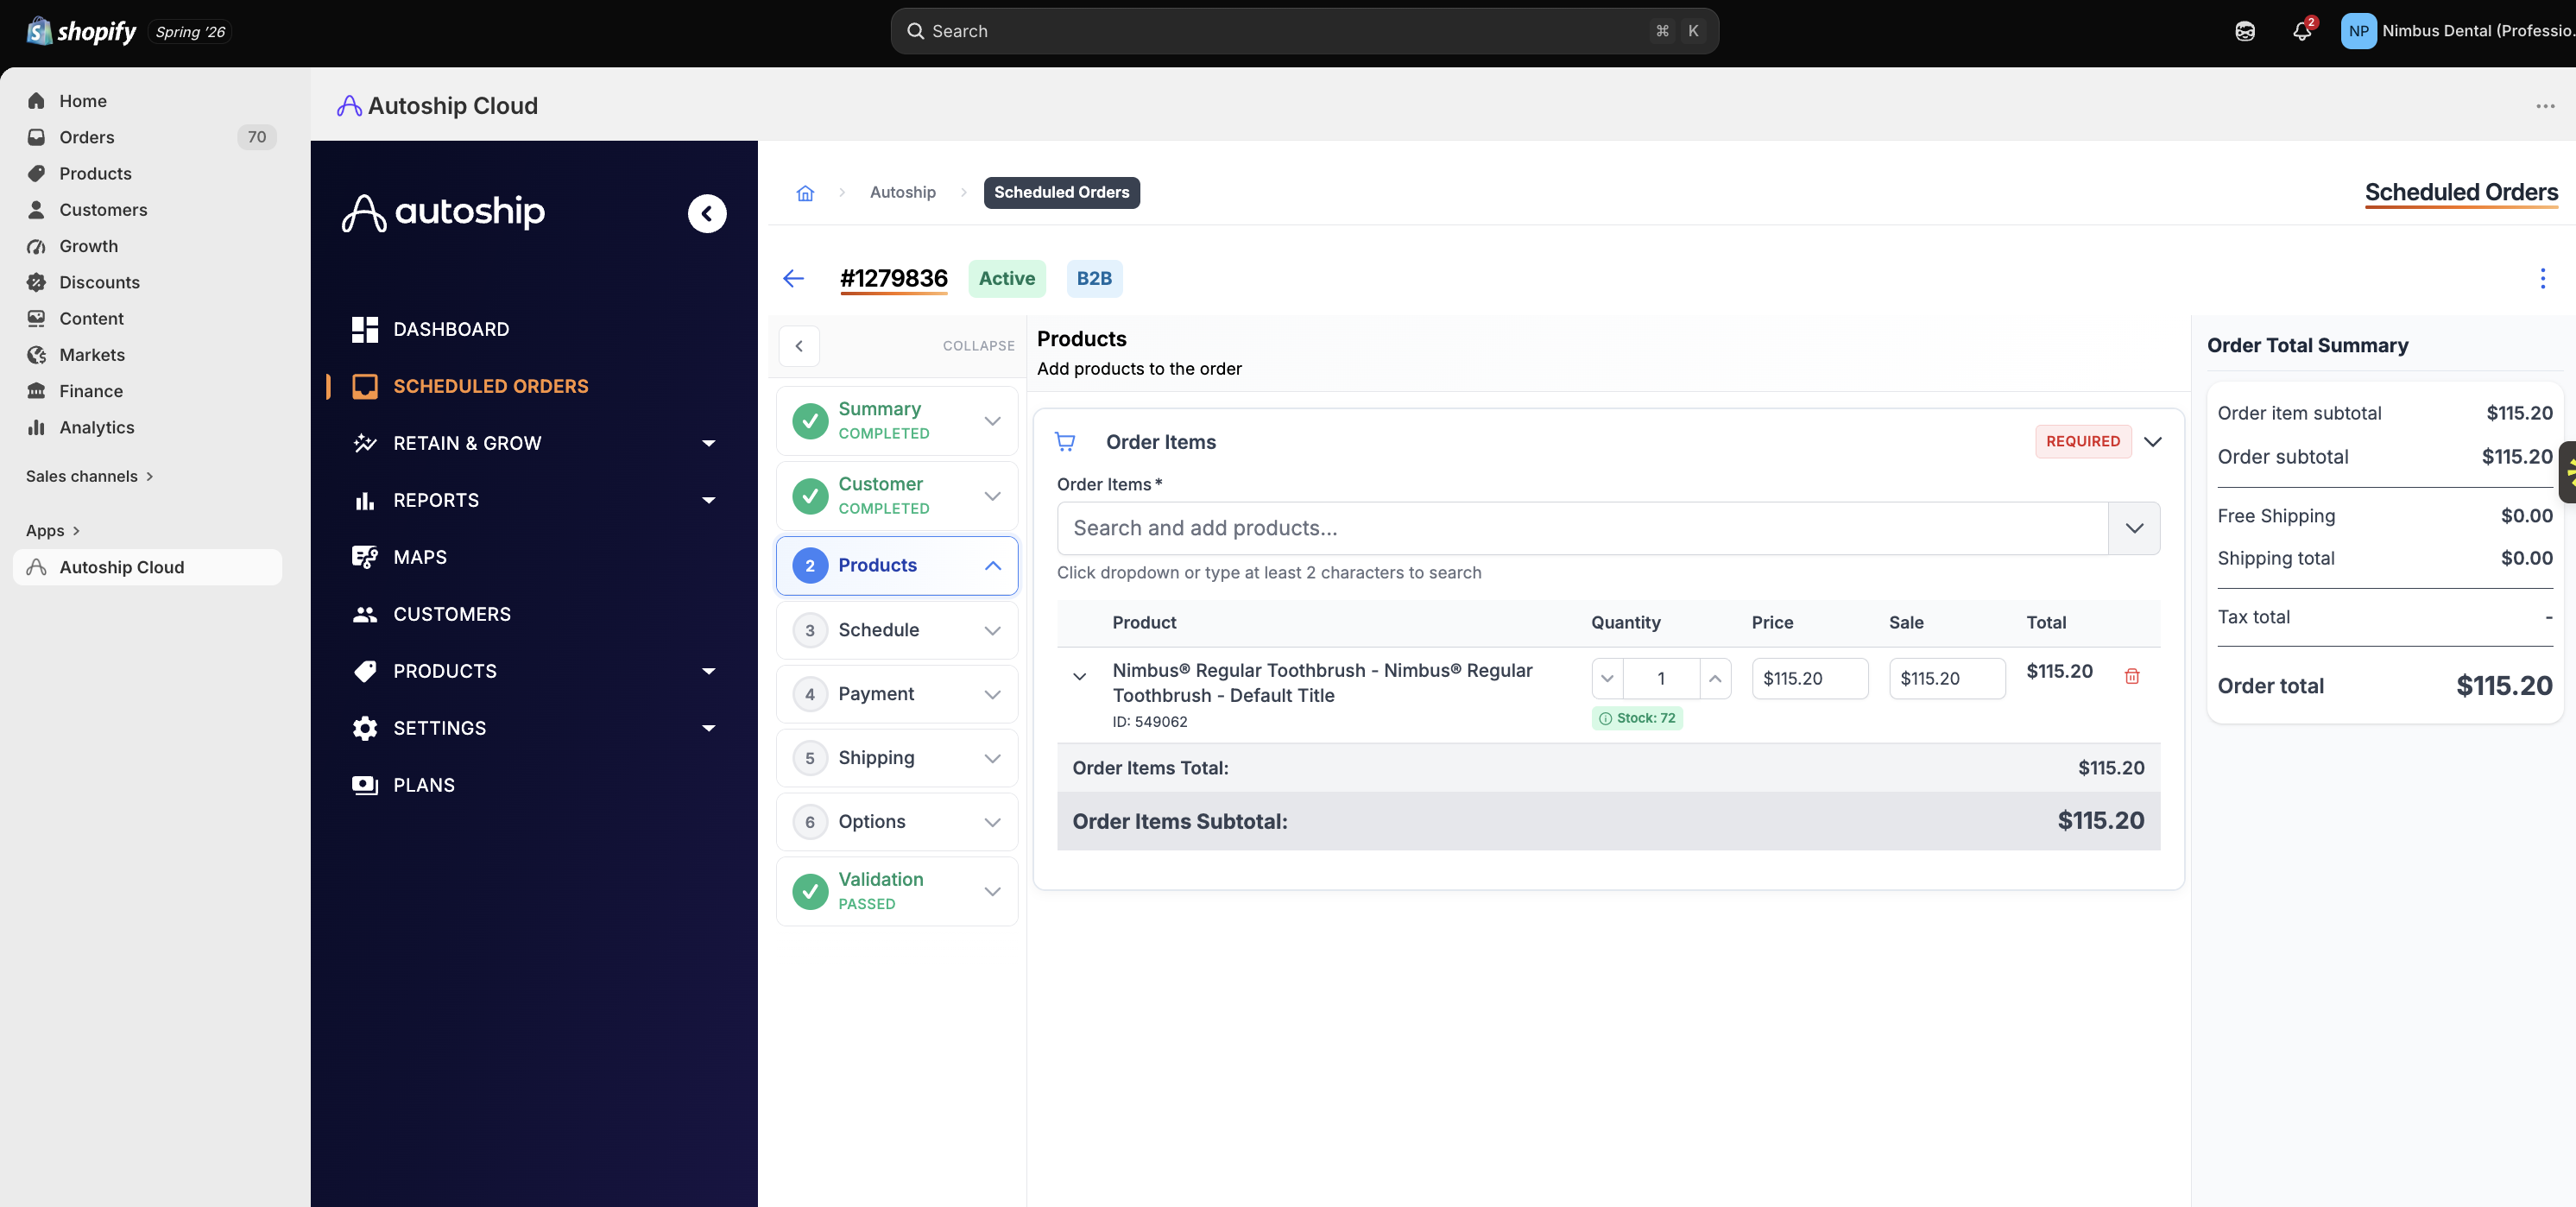
Each row shows live Shopify stock (for example Stock: 72), so you can see whether the next order can be filled.
Your team can add any product the location can buy, even if Add to Scheduled Order is turned off for that product. Buyers can only add products that have it turned on. These settings can be found in the Products section of Autoship.
Change the frequency or next order date
- Open the Schedule step.
- Under Frequency Settings, click the pencil icon to change the frequency. You can choose from the options that apply to the buyer's location.
- To move the next order, change the Next Occurrence Date.
- Save.
Changing the frequency also can change the Autoship discount if you have different discounts tied to different frequencies.
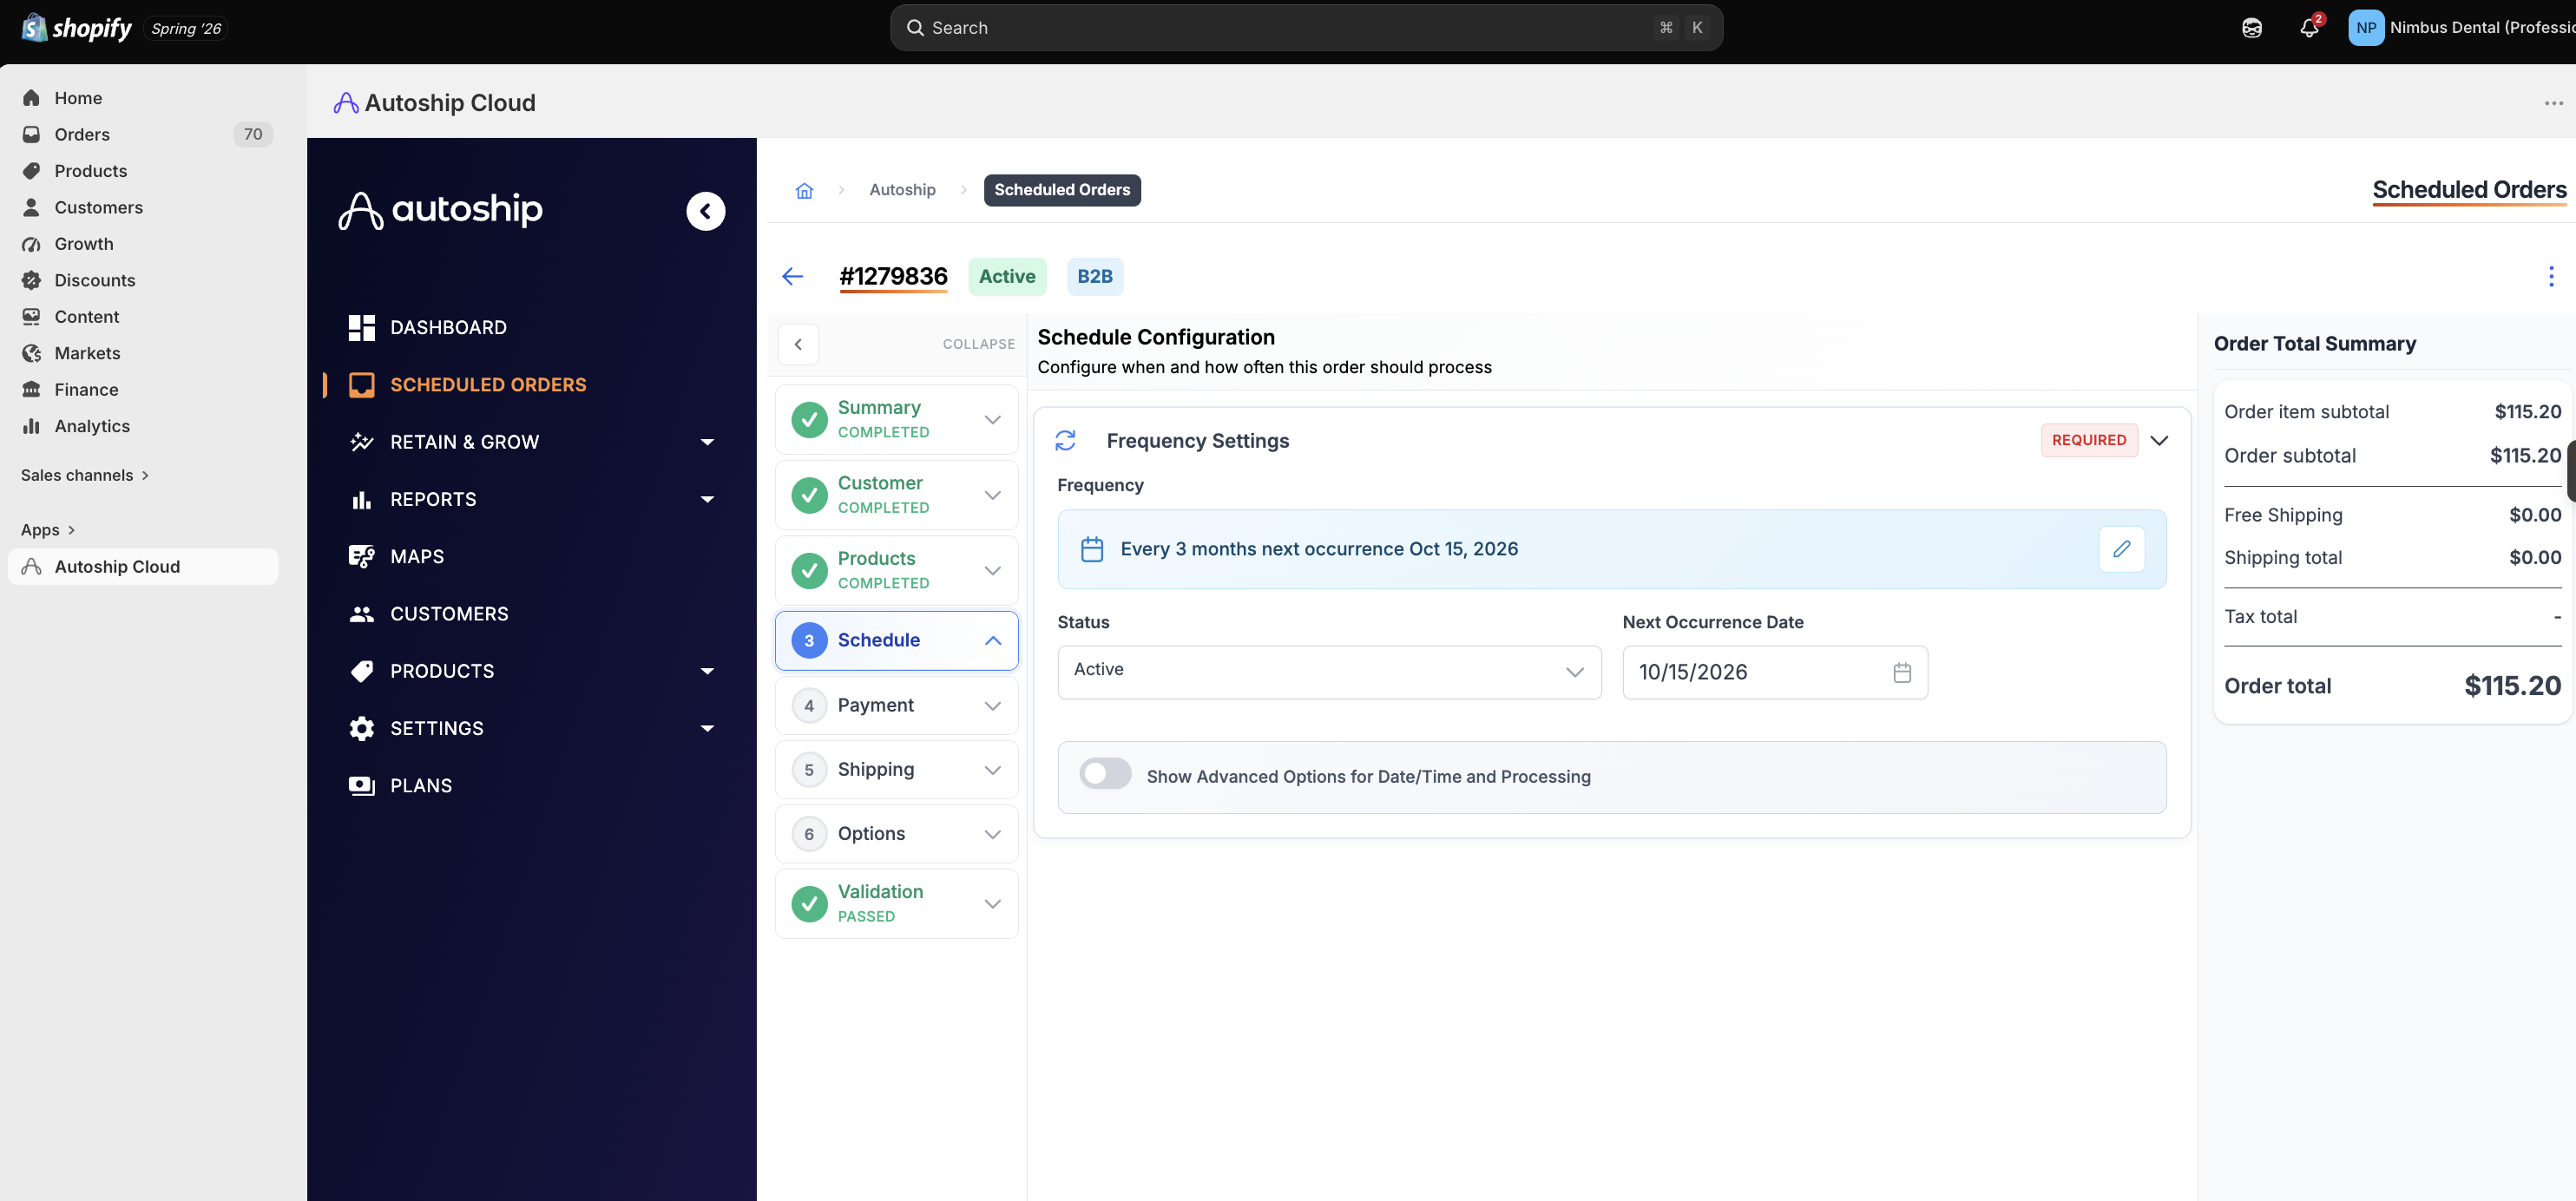
Show Advanced Options for Date/Time and Processing gives finer control over the processing time when you need it.
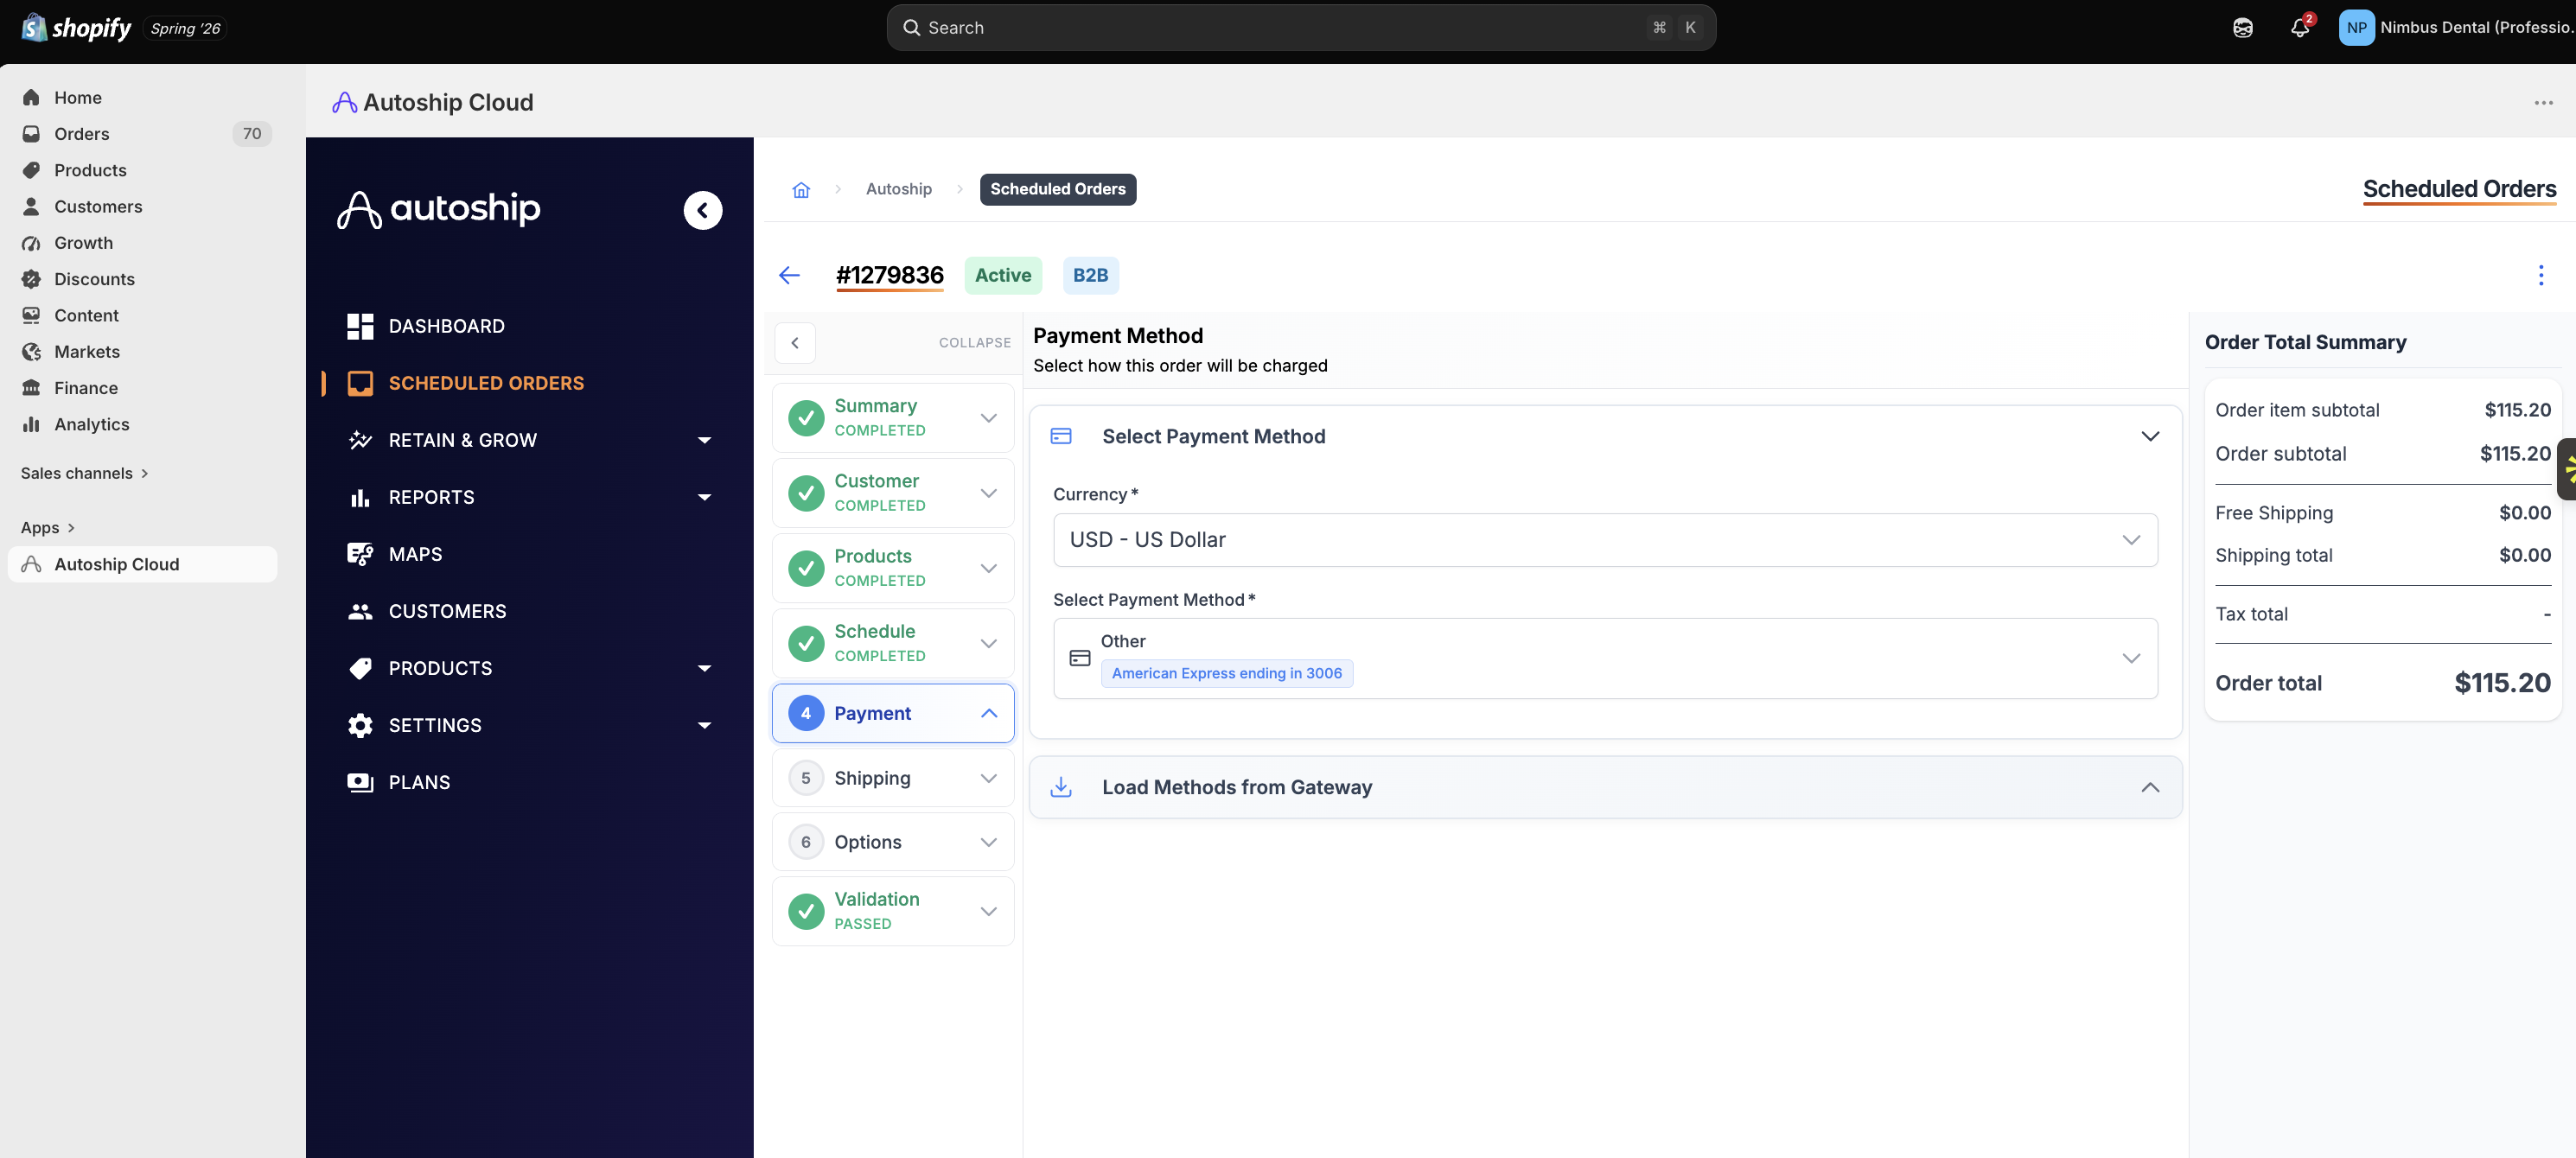
Change the payment method
- Open the Payment step.
- Under Select Payment Method, pick from the methods saved for the buyer.
- If a method the buyer just saved isn't listed, click Load Methods from Gateway to refresh the list.
- Save.
Locations that pay on payment terms don't need a saved method. Terms are shown but can't be changed on the Scheduled Order; change them on the company location in Shopify.
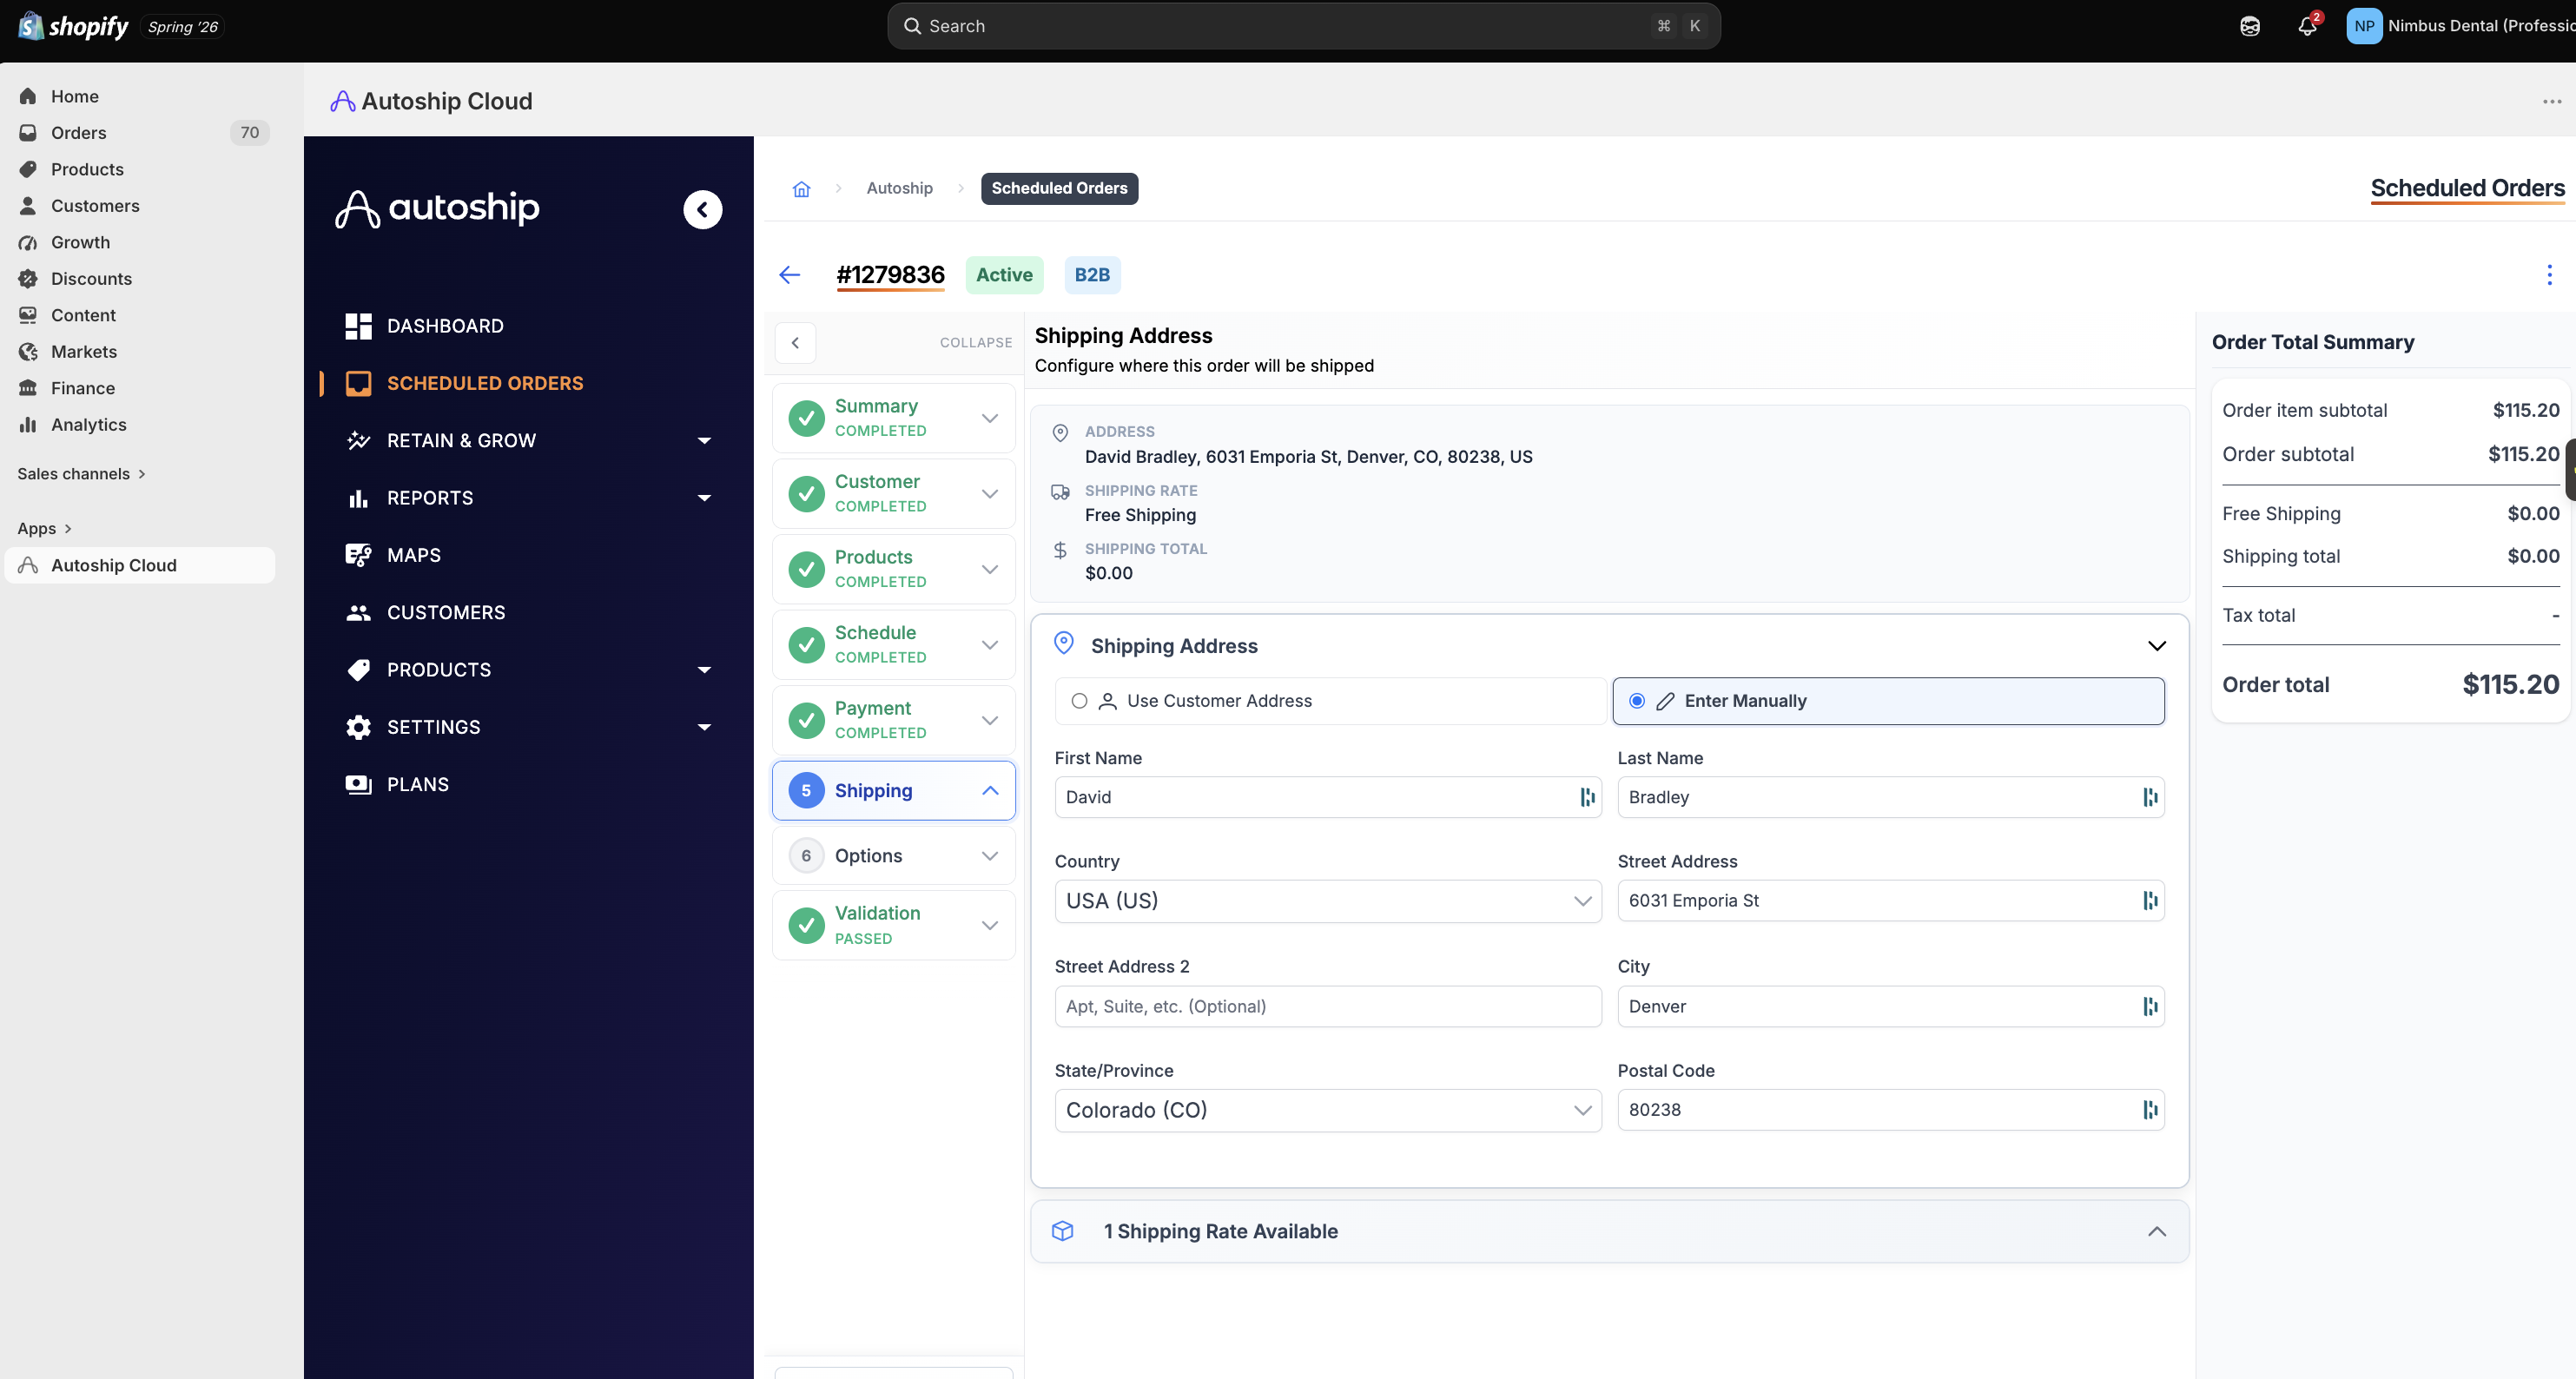
Change shipping
- Open the Shipping step.
- Choose Use Customer Address, or Enter Manually to type a different address.
- Open Shipping Rates Available and choose the rate to lock to this Scheduled Order.
- Save.
⚠️ Shipping on Scheduled Orders is set here in Autoship. Changing rates in Shopify doesn't change upcoming renewals.
Pause, reschedule, process now or cancel
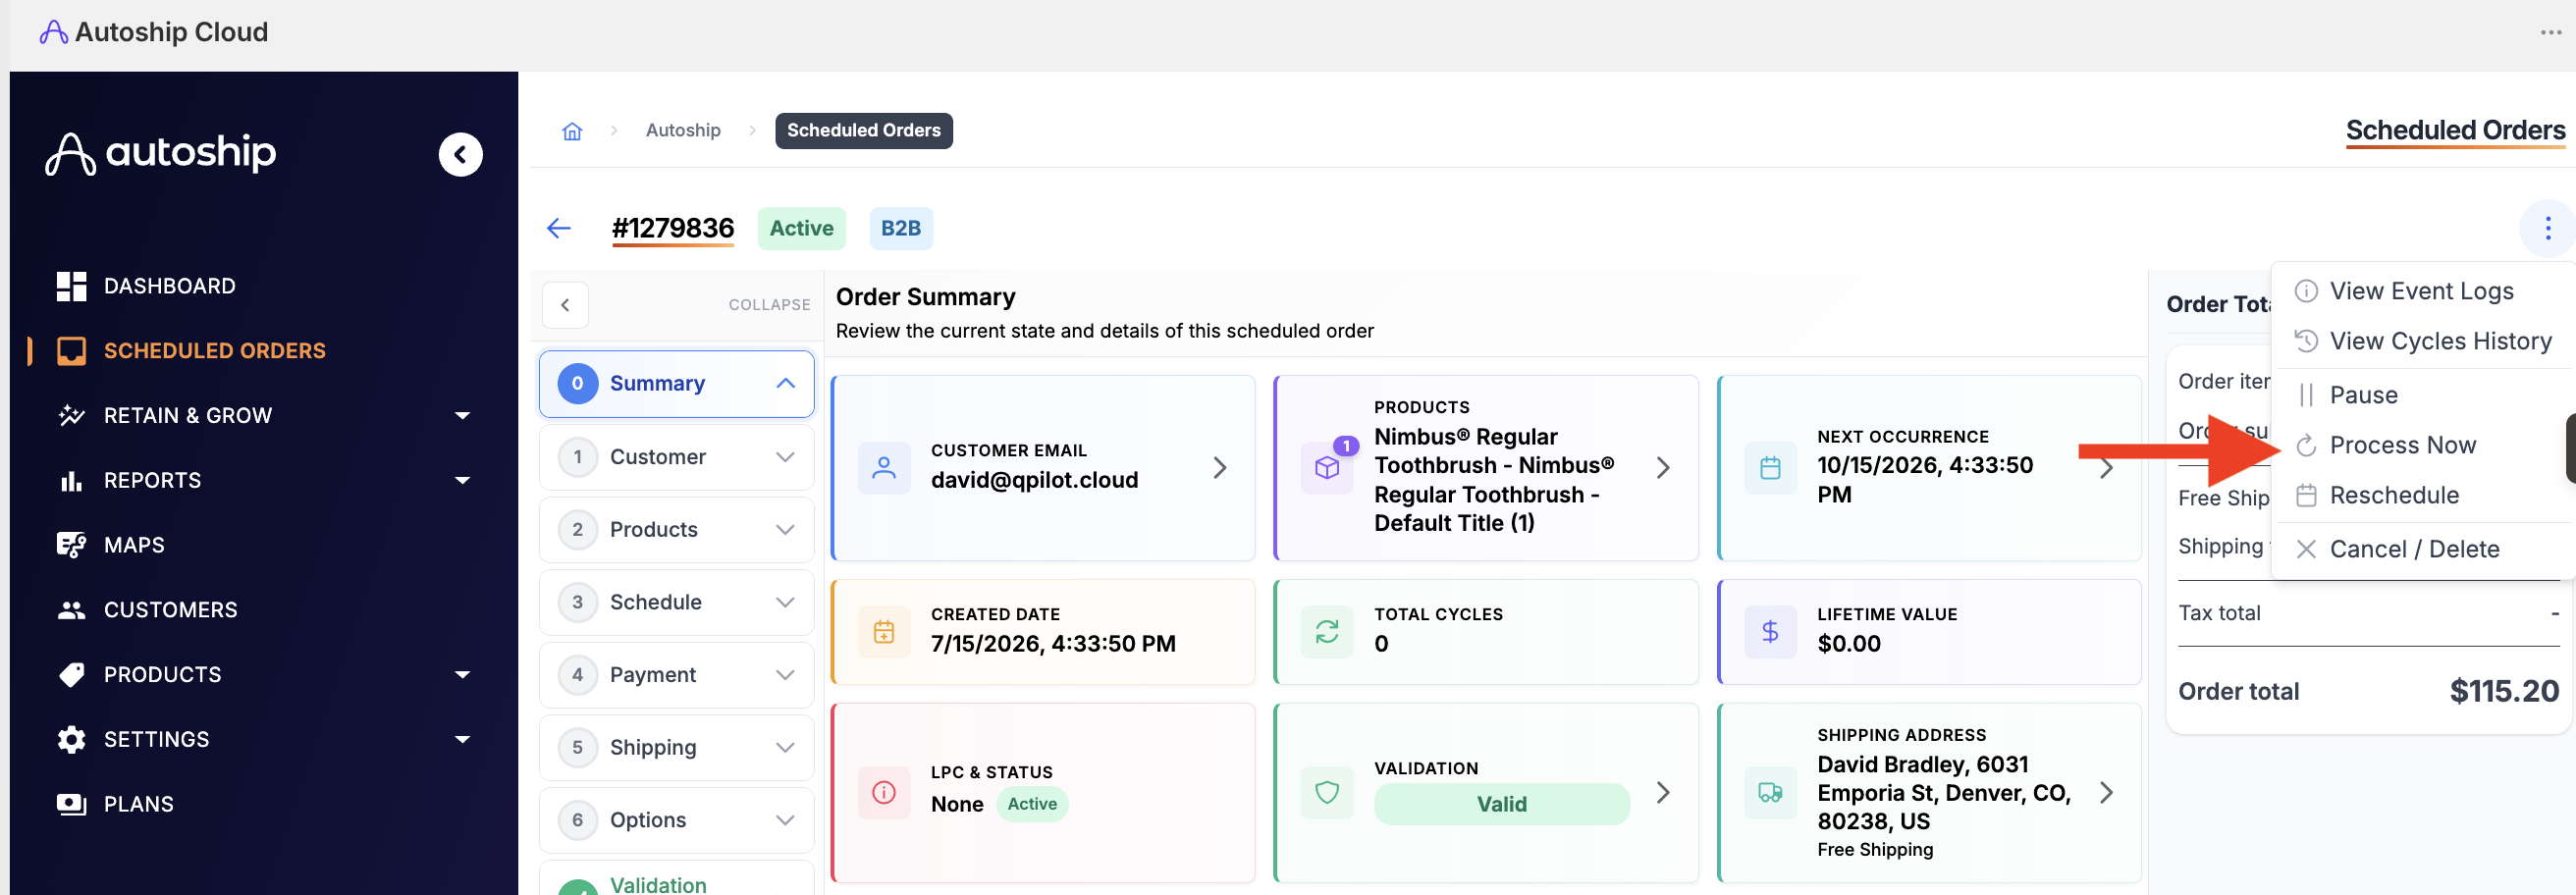
These actions change whether and when a Scheduled Order processes. They're all in the three-dot menu (⋮) at the top right of the Scheduled Order.
|
Action
|
What it does
|
Use it when
|
Can customers use this too? |
|
Process Now
|
Creates the next order immediately. Choose Process Now to create the next order today instead of on the next occurrence date. The order is priced and paid the same way as a normal renewal.
|
The account needs stock before the next date
|
Customers can unless you disable or hide this for your customer portal. |
|
Reschedule
|
Moves the next occurrence date. Choose Reschedule and pick a new date. Only the next order moves; the frequency stays the same, and later orders follow from the new date. You can also change the Next Occurrence Date directly on the Schedule step.
|
The account wants this one order earlier or later
|
Customers can choose a specific day in the customer portal. |
|
Pause
|
Stops the Scheduled Order from processing until it's resumed. A Snooze (or skip) is also configurable - which is a pause that automatically unpauses.
|
The account needs a break with no end date yet
|
Customers can unless you disable or hide this for your customer portal. |
|
Cancel / Delete
|
Ends the Scheduled Order. Choose Cancel / Delete to end the Scheduled Order. No further orders are created. Orders already created are not affected. You can "reactivate" from the same menu when a Scheduled Order is in a "deleted" status.
|
The account no longer wants it
|
Customers can cancel in their customer portal. Customers will need an admin to "reactivate" or can use a quick action link. |