ShipperHQ
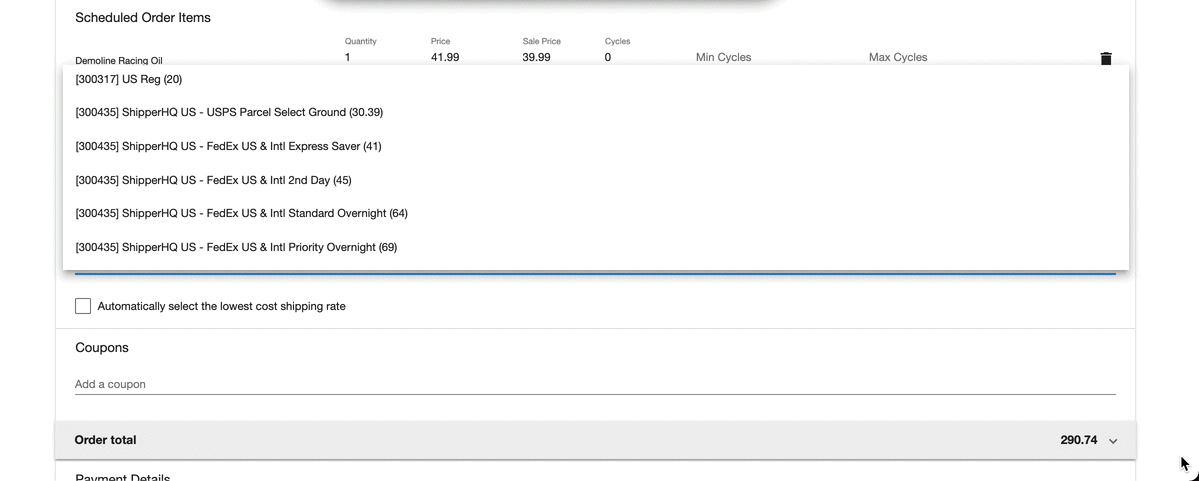
QPilot enables your ShipperHQ account to go beyond the checkout and provide a truly amazing scheduled and repeat delivery experience. When you integrate ShipperHQ with your QPilot Account, you can offer fully automated shipping rates across 50+ global shipping carriers for your Scheduled Orders.
📘 ShipperHQ™
ShipperHQ is the world's #1 shipping experience management platform and enables merchants to drive sales at checkout with flexible shipping rates and delivery methods tailored to the way you do business.
Connect your ShipperHQ Account to QPilot to apply carrier rates to Scheduled Orders.
How to Integrate & Setup ShipperHQ with QPilot
Step 1: Install and Verify ShipperHQ is working on your store's cart/checkout page
This will ensure ShipperHQ is working before testing the ShipperHQ integration shipping rates for Scheduled Orders.
ShipperHQ's Pricing and Platform Details
Step 2: Add a Post Code to your QPilot Site
After verifying your ShipperHQ plugin is providing shipping rates successfully on checkout orders, you can then set up the integration in QPilot. To start, set your QPilot Site's default Postal Code (aka origin). The ShipperHQ integration extends this feature by allowing users to ship from multiple origins (read more).
- Login to https://portal.qpilot.cloud/
- From the Sites page, select "Edit" from the site card menu.
- Set your site's base location in the "Options" tab.
- Set your site's Postal Code.
- Select "Update" to save these changes.
Step 3: Add the ShipperHQ integration for your site
- Select "Dashboard" from the site card menu, then select "Shipping Integrations" from the left-hand menu
- Create a new Shipping Integration (click the "+" icon) and select "ShipperHQ"
- Enter your ShipperHQ (API) Access Token - You will have received this when setting up your site in your ShipperHQ account
- If this is a "test" account, enable the "Test Mode" checkbox
-
Select "Create" to finish

Step 4: Create Shipping Rates for ShipperHQ
- Visit Dashboard > Shipping Rates and add a new Shipping Rate (select the blue "+" icon)
- In the shipping Shipping Type field, select "ShipperHQ"
- Set any other shipping conditions you would like to use to match this Shipping Rate to Scheduled Orders as outlined here: Managing Shipping Rates
Other Requirements:
- Products must have dimensions and weight. These properties are set in your connected site's Products and synchronized to QPilot.
- Like other shipping rates, the lowest/cheapest shipping rate that a Scheduled Order qualifies for will be applied automatically
- When multiple valid ShipperHQ rates can apply to a Scheduled Order, QPilot will automatically validate all of the potential rates and apply the lowest cost rate to the Scheduled Order. Read more about how shipping rates are validated in our doc How Shipping Rates Work.